Monday, October 21, 2019

Could not convert string to DateTimeOffset: 0001-01-01T00:00:00. Path '[0].LastDirSyncTime', line 1, position 104.

Exchange Hybrid Configuration Wizard errors, always fun.

What the Microsoft? How is this useful

'Could not convert string to DateTimeOffset: 0001-01-01T00:00:00. Path '[0].LastDirSyncTime', line 1, position 104.'


After lots of research and hardly any results for this strange error I was able to find a work around.

As the server I was performing this work on was in GMT+9:30 timezone the latest build of HCW was failing with the above error.

The logs showed no more information than this error and the credentials were correct.

Long of the short of it, a change in TimeZone (Not clock) resolved the issue to at least get the Hybrid Config finished.


I tried UTC-1:00 without success, so UTC-8:00 seemed to do the trick in the end.


And now we're good.

So hopefully this helps someone after the huge lack of info I could find online about this error!

Thanks Microsoft.🙄

Thursday, November 24, 2016

Microsoft Storage Spaces - HP Micro Server - Benchmarks

"Storage Spaces enables cost-effective, highly available, scalable, and flexible storage solutions for business-critical (virtual or physical) deployments. Storage Spaces delivers sophisticated storage virtualization capabilities, which empower customers to use industry-standard storage for single computer and scalable multi-node deployments. It is appropriate for a wide range of customers, including enterprise and cloud hosting companies, which use Windows Server for highly available storage that can cost-effectively grow with demand."

In Microsft Windows 8/8.1/10/ Server 2012/2012 R2/2016 Storage Spaces is an alternative method of joining multiple Physical Drives into a variety of 'Virtual Disks'. This has a few advantages in the form of high flexibility, but comes with the caveats of lower speeds than traditional hardware raid.

I have recently acquired a Gen8 HP Micro Server with 4x 2TB Western Digital RED drives in it. The Micro Server has an inbuilt Software Raid controller capable of only Raid 1 and Raid 0, so I'm interested in Storage Spaces for a Raid 5 equivilent.

The part I'm most interested in is the speeds the three modes can run at, so I've performed just a few quick benchmarks on each mode (Simple, Mirror, Parity) for a short comparison, enjoy!
Server Manager - Storage Spaces
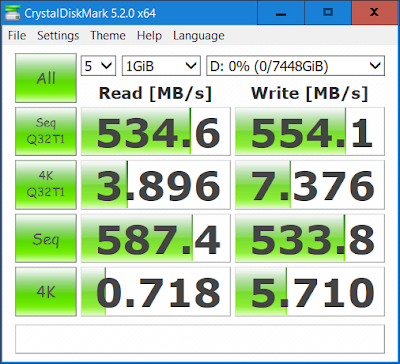
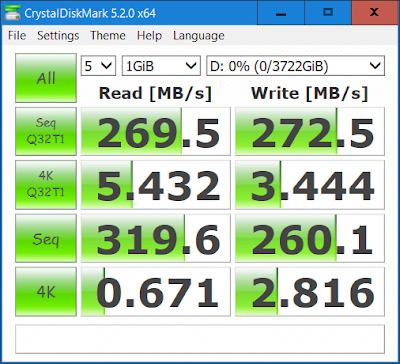
Crystal Disk Mark
Virtual Disk - Simple Mode
Virtual Disk - Mirror Mode
Virtual Disk - Parity Mode


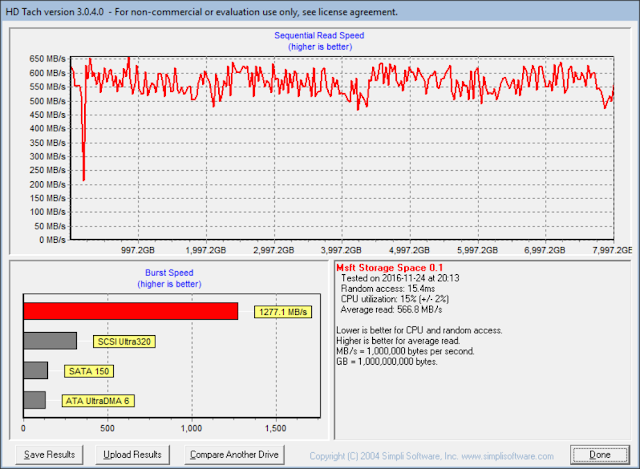
HDTach
Virtual Disk - Simple Mode
Virtual Disk - Mirror Mode
Virtual Disk - Parity Mode

So in conclusion, Simple mode offers the highest throughput, as its essentially offering 4 disk Raid 0.
Mirror Mode offers a nice balance, at the expense of storage capacity and Parity Mode gives the best comprimise between storage space and redundancy at the expense of write speed.

I believe the reason the Parity HDTach result is so high is due to the fact it uses a cache for reading data, so the speed is actually the Interface Speed rather than the disk speed, so I believe the Crystal Disk Mark result is more reliable in this instance.

Read more about Storage Spaces here: https://technet.microsoft.com/en-us/library/hh831739%28v=ws.11%29.aspx?f=255&MSPPError=-2147217396

Tuesday, October 27, 2015

iTalkBB and 3CX (Or any VoIP Phone System)

iTalkBB is a commonly used Chinese VoIP supplier, they offer many products which make it very easy for overseas Customers and Businesses to get a China Phone number with ease.

iTalkBB supply a preconfigured (and locked down) Cisco SPA-3102 which has an analog line output which you simply plug into any internet connection, plug a phone in and your done!

The problem is if you want to plug that VoIP number into another phone system and utilize the connection outside of their SPA-3102. iTalkBB do not officially support alternative connection methods so the only way previously was to perform a Man-In-The-Middle (MitM) attack and snoop the Username and Password.

The issue now is iTalkBB have moved from http to https and thus securing the MitM attacks from happening, so we are no longer able to retrieve the username and password for our own use.

So while this solution is a little cumbersome it's a reliable method of handling a connection to the iTalkBB supplied box and utilizing the number from another VoIP capable phone system.
Breakdown of connectivity

Essentially we are putting a second Cisco SPA as an FXO to accept the iTalkBB signal and convert it back to digital, any FXO device will be able to do this.

(If you are using this with direct 3CX or another VoIP Phone system, the '3CX SBC' would be removed from the diagram)

Configuration of the iTalkBB SPA-3102 is locked, so we will need to configure the SPA-232D to take the ring type, hang up tones and line voltage the SPA-3102 delivers.

I personally use the 'Internet' port of the SPA-232D when installing into any network, this ensures there is no chance the DHCP server on the 232D can affect your local network, the only draw back is you need to manually enable the Web Admin from WAN Port in the settings first, this is done by plugging into the 232D on the Ethernet port, you should get an IP in the 192.168.15.x range; then visit the SPA-232D's default webpage on http://192.168.15.1 , login as admin

Start by logging into your SPA-232D as admin (default password: admin) and navigating to the Administration Tab.

You are required to change the Admin password to something other than defaults to enable the Web Access, so click on 'User List' on the left and modifying the password.


Now navigate to 'Web Access Management' also in Administration and click on the 'Enable' radio button (It's worth also clicking 'Enable' to the Remote Upgrade radio button at the same time, as you are unable to modify this option when logged in from the WAN interface.

Now you can plug the Ethernet into the 'Internet' port and manage it.

(Note: If you want your device to have a static IP on the WAN port, navigate to 'Network Setup' and 'Internet Settings' now and set the IP).

Now that the Cisco SPA-232D is on the network and ready to be configured we can navigate to the 'Voice' tab and down to 'Line 1' and change it to 'Line Enable: No' so that only the PSTN port is active.


Then we can move to the 'PSTN' section and begin configuring the PSTN line for SIP and PSTN settings.

At this point you will want to configure your phone system for a PSTN Gateway so you have some authentication details to use; if you're using 3CX navigate to 'PSTN Gateways' and setup a generic gateway device. If you are using this via an SBC enter the Static IP you set on the SPA-232D (Even though its on a different network the SBC will take care of that). Take note of the Gateway Port as well, Linksys/Cisco SPA-3102 would use 5062 as a default, we can set that here and in the SPA-232D.

Now back to the SPA-232D


Make sure 'PSTN Line Enable' is set to Yes and the SIP Port is 5062 as we setup in 3CX (Set to something different if your Phonesystem wanted something different)


Now set your Proxy (Phone system IP/FQDN and Port)
(If using an SBC). Enable 'Use Outbound Proxy' and 'Use OB Proxy in Dialog'

In Subscriber Information leave the Display Name and enter your credentials you created earlier in the Auth ID, User ID and Password, and set 'Use Auth ID' to yes.

In the Dial Plans section, set the “Dial Plan 8″ field to “(S0<:yyyy>)” where yyyy must be replaced with the ID that you entered for the line in the 3CX Phone System Management Console. For example, if the ID used was “10700″, the “Dial Plan 8″ field must be set to “(S0<:10700>)”.

In the VoIP-To-PSTN Gateway setup section:
a. Set the 'VoIP-To-PSTN Gateway Enable' field to 'yes'.
b. Set the 'VoIP Caller Auth Method' field to 'none'.
c. Set the 'One Stage Dialling' field to 'yes'.
d. Set the 'Line 1 VoIP Caller DP' to '8'.

In the PSTN-To-VoIP Gateway Setup section:
a. Set the 'PSTN-To-VoIP Gateway Enable' field to 'yes'.
b. Set the 'PSTN Caller Auth Method' field to 'none'.
c. Set the 'PSTN Caller Default DP' field to '8″.
d. Set the 'PSTN CID for VOIP CID' field to 'yes'.
e. Set the 'PSTN Caller ID Pattern' field to '*'. Note that in some geographical areas, this may cause incoming calls to fail, because the device incorrectly interprets the CallerID format. If this is the case, you may need to disable CallerID parsing by setting this field to empty.

By default, the SPA-232D will wait for 16 seconds before delivering a call to a SIP device. To change this, go to the 'FXO Timer Values (sec)' section, and change the 'PSTN Answer Delay' field to 0. This will set the gateway to answer calls immediately.

Set your 'FXO Country Setting' to your Country that the iTalkBB was shipped to,

Lastly because this is plugged into an SPA-3102 the line voltage is much lower than your carrier's PSTN network, so we need to drop the 'Line-In-Use Voltage' down to be below the SPA-3102's ~28v, so change this to '18'

Now click 'Submit' and the SPA-232D should restart, register against 3CX and be available for receiving and making calls!

Now maybe one day iTalkBB will sell a direct SIP service and we can skip this whole mess!

Monday, October 19, 2015

Exchange 2010: Unable to open Exchange Management Console - Initialization Failed - Kerberos Authentication Failed

I've been grappling with this issue on and off for a few years now, previously I found no useful information so a simple server restart would fix the problem. It would only pop up occasionally and generally only on a server that had been running for months.

Now I've found a couple of very useful links to help fix the problem quickly and without a reboot!


To fix the Kerberos issue use the steps which Scott Williamson describes here: http://blogs.technet.com/b/whats_on_scotts_mind_today/archive/2012/12/07/exchange-2010-unable-to-open-exchange-management-console-initialization-failed.aspx

A break down as follows:
Problem:  Exchange Management Console in Exchange 2010 will not open and references a server that is down or has been removed from the environment. 
Error Verbiage: Initialization Failed 
The following error occurred while attempting to connect to the specified Exchange server 'exchange.contoso.com': 
The attempt to connect to http://exchange.contoso.com/powershell using 'Kerberos' authentication failed: Connecting to the remote server failed with the following error message : WinRM cannot process the request. The following error occurred while using Kerberos  authentication: The network path was not found.

Resolutions:
Method 1:
  1. Close all MMC/EMC instances before proceeding.
  2. Open Registry Editor (regedit) as the user you run the EMC under.
  3. Go to HKEY_CURRENT_USER\SOFTWARE\Microsoft\ExchangeServer\v14\AdminTools
  4. Look for value NodeStructureSetting.
  5. If it is there, back it up and then remove it.
Method 2:
  1. Close all MMC/EMC Instances before proceeding.
  2. Open Powershell or Powershell IDE as the user you run the EMC under and execute the following command:.
  3. Remove-ItemProperty -Path HKCU:\Software\Microsoft\ExchangeServer\v14\AdminTools\ -Name NodeStructureSettings
  4. Close Powershell
After performing either of the methods above to remove the registry entry you should be able to open the Exchange Management Console and it will discover another Exchange server and connect.

After this is fixed I would then run into a problem because I had clicked on 'Retry' too many times which would cause the system load to overrun and stop processing.

The fix is very simple (Almost too simple!) and is detailed here: http://www.vspbreda.nl/nl/2013/07/exchange-2010-error-solved-the-ws-management-service-cannot-process-the-request-the-system-load-quota-of-1000-requests-per-2-seconds-has-been-exceeded/

But the short version is, simply run IISRESET from an elevated command prompt and you're done!


Monday, December 15, 2014

Windows Server 2012 R2 Backup Error 0x80780119

Brand new server, install Windows 2012 R2 (inc Update 1), get everything setup and attempt to run a backup... and what do we get?


Above: Snip from the Windows Server Backup Error


Above: Snip from Event Viewer

So naturally one would be rather confused, a new server out of disk space?!


After some research I came across this Microsoft KB Article:

https://support.microsoft.com/kb/2930294
"System image backup fails after you upgrade to Windows 8.1 or Windows Server 2012 R2"
Very simple procedure; all I can add is once all is completed, if you had to move the Recovery Partition to the end of the disk like I did, you'll need to update the Windows Server Backup Schedule as the 'Recovery' partition ID will have changed and WSB fails if you have not updated the schedule.

Monday, February 18, 2013

Expanding an EXT4 partition Online

As I needed to expand my Virtual Linux Machine's HDD as it filled up again.

I came across this useful post from Soren on askubuntu.com

http://askubuntu.com/questions/24027/how-to-resize-a-ext4-root-partition-at-runtime

(Direct Link: http://askubuntu.com/a/119458)

Thanks Soren!

Wednesday, November 14, 2012

Exchange Contact Photos GAL

So you may or may not have seen some organisations have Contact Card pictures when you browse the Exchange contact list.

They attach to the users Active Directory username and appear in a few locations, most which are seen in Outlook (Android can also use them when syncing your Exchange Email Account and Contacts).

Above: Hover Contact Card

This is done using a powershell command in the Exchange Console called Import-RecipientDataProperty

To read how to do this manually please visit this Technet Blog on GAL Photos in Exchange.

If you are interested in accelerating the process and prefer to use a GUI I have come across this very neat utility by CJWDEV called AD Photo Edit. There is a free version which allows for single imports (Which is what I use), and a paid version which allows bulk imports.

Above: AD Photo Edit Free Edition

Simply put a name into the search field and click search.

Above: Search Results

Now click on Edit Image

Above: Edit Image Window


Microsoft States that you need to have a MAXIMUM dimension of 96x96 for your Contact Image, fortunately this program has a 'Resize to recommended dimensions' which automatically resizes the image to 96 pixels on the longest side, maintaining aspect ratio. So simply click 'Select New Image' pick your image and then click on 'Resize to recommended dimensions' and click ok.

Above: New Image selected and Resized

Now click on the OK button and the program will resize the image and upload it to the AD database for you!

Above: Confirmation the upload was successful

Now you can go back to Outlook and if you are in non-cached mode the picture will update instantly.

Above: Updated GAL Photo


Now some notes..

- Outlook Cached clients will not see the new photos until you manually update the OAB which can be done using the following PS command.

Update-OfflineAddressBook "Default Offline Address Book"

For more information on this read the section titled "GAL Photos and the Offline Address Book" on the Technet Blog

- If you want to bulk resize without relying on the AD Photo Edit program I recommend Paint.Net with the Bulk Image Processor plugin which will allow you to select all photos and resize in one go.

- If you get any errors to do with thumbnailPhoto properties, please ensure your schema has the correct properties set as per the Technet Blog

Wednesday, May 30, 2012

Windows Server Backup Error code 2155348010

Windows Server Backup is a great basic inbuilt utility to backup your Windows 2008/R2 servers.

But is also just that, as basic utility, it has some smarts, but trips itself up often if the circumstances are right.

Microsoft recommend your backup disks are 150% greater than the data you are backing up so that it can have enough space to create the number of snapshots it wants.

The problem is if you don't have that extra space and you run very close to your disk size, any large change in data will attempt to 'overfill' the disk and the fail due to error.

Now Microsoft don't recommend this solution, however it is a work around :).

Above: Windows Server Backup Disk Usage

As you can see, I have enough room for day to day changes (around 4GB on average), so WSB can recycle the space happily, however recently I moved a VHD from one disk to the other, so suddenly the incremental change was 120GB, which will never fit.

Above: Windows Server Backup Status

 So suddenly I was getting failed backups with the error:


 One of the backup files could not be created. Detailed error: There is not enough space on the disk.  

When this happens you have three choices.
- Buy new, larger backup disks
- Reduce the amount you are backing up
- Try Delete the oldest snapshots off the backup disk.

You know how to do the first two, so lets get on to how to remove the oldest snapshots to give us some more space on the hdd.

Note: Once removed you cannot get them back, so make sure your systems are all in working order, ie do this at your own risk!

We need to start by identifying the backup disk's UID. To do this we open command prompt and run mountvol with no switches.


 C:\Users\Administrator>mountvol  
 Creates, deletes, or lists a volume mount point.  
   
 MOUNTVOL [drive:]path VolumeName  
 MOUNTVOL [drive:]path /D  
 MOUNTVOL [drive:]path /L  
 MOUNTVOL [drive:]path /P  
 MOUNTVOL /R  
 MOUNTVOL /N  
 MOUNTVOL /E  
   
   path    Specifies the existing NTFS directory where the mount  
         point will reside.  
   VolumeName Specifies the volume name that is the target of the mount  
         point.  
   /D     Removes the volume mount point from the specified directory.  
   /L     Lists the mounted volume name for the specified directory.  
   /P     Removes the volume mount point from the specified directory,  
         dismounts the volume, and makes the volume not mountable.  
         You can make the volume mountable again by creating a volume  
         mount point.  
   /R     Removes volume mount point directories and registry settings  
         for volumes that are no longer in the system.  
   /N     Disables automatic mounting of new volumes.  
   /E     Re-enables automatic mounting of new volumes.  
   
 Possible values for VolumeName along with current mount points are:  
   
   \\?\Volume{768cb7c0-93e6-11e1-811d-806e6f6e6963}\  
     *** NO MOUNT POINTS ***  
   
   \\?\Volume{19941286-93e7-11e1-9a8b-00259063b05d}\  
     D:\  
   
   \\?\Volume{0de85de0-9849-11e1-ae67-00259049b4c2}\  
     *** NO MOUNT POINTS ***  
   
   \\?\Volume{768cb7c1-93e6-11e1-811d-806e6f6e6963}\  
     C:\  
   
   \\?\Volume{768cb7c4-93e6-11e1-811d-806e6f6e6963}\  
     E:\  

The bottom section is what we are interested in. Most particularly the Volumes with '** NO MOUNT POINTS **, as the backup disk does not get mounted with a drive letter.

I'm not sure why, I'm sure someone could fill me in though, the System Drive is always listed twice, one with a drive letter and one without.

The disk we are looking for is the 3rd disk down, which has a UID different to the others. The information we need is the entire string: \\?\Volume{0de85de0-9849-11e1-ae67-00259049b4c2}

Now the next command is for the actual deletion of the snapshots.

For this we use a builtin utility called 'DISKSHADOW', simply type this into a command prompt to enter the utility.

Now type delete shadows OLDEST -VolID-

which in the examples case would be:
delete shadows OLDEST \\?\Volume{0de85de0-9849-11e1-ae67-00259049b4c2}

When run you should see something similar to:


 DISKSHADOW> delete shadows OLDEST \\?\Volume{0de85de0-9849-11e1-ae67-00259049b4c2}  
   
 Deleting shadow copy {47c0fd32-c3e9-4c66-8481-2ac004b6d2ff} on volume \\?\Volume  
 {0de85de0-9849-11e1-ae67-00259049b4c2}\ from provider {b5946137-7b9f-4925-af80-5  
 1abd60b20d5} [Attributes: 0x00020019]...  
   
 1 shadow copy deleted.  
   
 DISKSHADOW>  

Now when you look back at your Windows Server Backup:
Above: Windows Server Backup Disk Usage

You are actually able to delete all the shadow copies on the disk, so that only one copy remains if you wish. But again be certain you don't need to go back in time to retrieve this data!

So use all of this information at your own risk, but if this is what you were searching to do, that's how to you it :)

Saturday, December 3, 2011

Time Lapse Project - CHDK


 Canon Hack Development Kit

Today I loaded the CHDK firmware to my SD Card.

I Located the appropriate firmware on the wiki http://chdk.wikia.com/wiki/CHDK

Followed the installation guide here: http://chdk.wikia.com/wiki/File:CHDK_Installation_Guide.pdf

Then it was finished! (I thought it would be harder than this!)

So I took the next step and located a script for running the time lapse auto shoot..


I came across another part of the wiki where users had already written scritps to perform these actions!

http://chdk.wikia.com/wiki/UBASIC/Scripts:_Ultra_Intervalometer

I tried a few different scripts, but ended up using the one below:


rem Author - Keoeeit
 rem Upgraded by Mika Tanninen
 @title Ultra Intervalometer
 @param a Delay 1st Shot (Mins)
 @default a 0
 @param b Delay 1st Shot (Secs)
 @default b 0
 @param c Number of Shots (0 inf)
 @default c 0
 @param d Interval (Minutes)
 @default d 0
 @param e Interval (Seconds)
 @default e 10
 @param f Interval (10th Seconds)
 @default f 0
 n=0
 t=(d*600+e*10+f)*100
 if c<1 then let c=0
 if t<100 then let t=100
 g=(a*60)+b
 if g<=0 then goto "interval"
 for m=1 to g
  print "Intvl Begins:", (g-m)/60; "min", (g-m)%60; "sec"
  sleep 930
  next m
 :interval
   n=n+1
   if c=0 then print "Shot", n else print "Shot", n, "of", c
   shoot
   if n=c then end
   sleep t
   goto "interval"
 
Then on the camera I loaded the script up, and it started shooting!

This is all too easy :)

One question I had was, how do I get the script to start as soon as the camera is turned on?
Turns out there is a feature for that in CHDK already as well!

As I was researching how to do it, I came across this persons issue where they had turned autostart on by accident!
http://www.flickr.com/groups/canonsx30/discuss/72157626084300606/

So I enabled autostart and the script... auto started!

Naturally I grabbed my gorillapod and threw it onto my window ledge and took it's very first time lapse!


Above: The camera on my Joby GorillaPod SLR Edition.

How did it turn out you ask?

See for yourself :)


(I reversed the footage, as it was more interesting watching the sunrise.... set.. so to speak :) )


Friday, December 2, 2011

Time Lapse Project

I recently stumbled across the CHDK website < http://chdk.wikia.com/wiki/CHDK > and started to get interested in just how easy it was to turn a normal Point and Shoot camera into a Time Lapse beast!

I've previously shot my time lapses with a web cam hooked up to a computer:


Then I wanted greater quality, so I purchased an Intervalometer and Power Adaptor for my Canon EOS 400D:


It got my thinking... just how far could I go with my love of Time Lapse.

To produce a good time lapse video, you require plenty of SD card space (Or hdd space), continuous power, a camera in a fixed position and.. time!

So a regular Point and Shoot camera can't really give you plenty of SD Card space or continuous power.. until I realised Canon produce Power Adaptors for some of their Point and Shoot range!


Of course, until I purchased a camera, all of this was just ideas.

Then someone posted for sale, second hand, a Canon IXUS 80 IS for $45!

I did some research and found out it was indeed compatible with the Canon AC ADAPTER KIT ACK-DC10. Half my issue solved!

Here it is, in all its used beauty :)


Now on to finding out how to load the CHDK firmware on... stay tuned.