Tuesday, May 3, 2011

Group Policy - Changing Default Search Provider in IE 7, 8 and 9

Controlling your users Internet Explorer 7, 8 and 9 Search Providers is very easy.

There are various methods of trying to change the search provider, but thanks to the new 'AntiPhishing' component of Internet Explorer 8, non-supported methods will end up with the user having a prompt when they first launch IE.
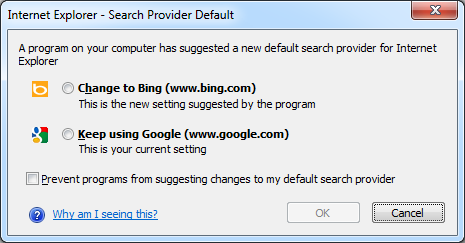
Above: Microsoft's AntiPhishing pop-up alerting the user that an unauthorized change had been made.

So the only way to control the search providers is via Group Policy. But of course Microsoft only included half of the required policies for this to be achieved out of the box.

Above: GPMC Path to the Internet Explorer Setting

When you "Enable" this feature, in the Help text it states.

Help:
 If you enable this policy setting, the user will not be able to configure the list of 
search providers on their computer, and any default providers installed will not 
appear (including providers installed from other applications). The only providers 
that will appear will be those in the list of search provider policy keys 
(found under [HKCU or HKLM\Software\policies\Microsoft\Internet Explorer\SearchScopes]). 
Note: This list can be created using a custom administrative template file. 
For information on creating this custom administrative template file, see the 
Internet Explorer documentation on search providers.   
So they have given us half the story and the rest you have to research and code yourself! Thanks MS!

Thankfully I found it to be a lot easier than I expected and found some resources with prewritten ADM files.

Simple copy and paste the next lot of code into Notepad, and save it as an ADM file. (Remember to select Save as type: All Files (*.*))

UPDATE: I believe i've fixed the output errors on the blog. So you can either copy and paste or download from pastebin.

http://pastebin.com/3SaKmqkG


Remember to 'Download' it, not copy, as even PasteBin formats it incorrectly. However it is ok when you click download from pastebin.


(Thanks Nebulis01 for the PasteBin :) )
IE8SearchProviders.ADM

 ; Based on 'Group Policy Search Providers ADM File', provided by schema_mangler  
 ; Posted to microsoft.public.internetexplorer.general on 17 Nov 2006, 22:52  
 ; Search Google Groups for the original, and see http://support.microsoft.com/kb/918238  
 ; CRGS version changes:; Tidied up unnecessary [strings]  
 ; Changed Bing, Google, Yahoo, Ask to latest versions, added Search Suggestions  
 ; Added Amazon UK, eBay, Wikipedia via Microsoft site  
 ; Also set the Google GUID to the lowest value, so that it is default  
   
 CLASS USER  
 CATEGORY !!WindowsComponents  
 CATEGORY !!InternetExplorer  
   
 POLICY "Select search providers to be included in policy-based search list"  
     #if version >= 4  
     SUPPORTED !!SUPPORTED_IE7  
     #endif  
     EXPLAIN !!Search_Explain  
     KEYNAME "Software\Policies\Microsoft\Internet Explorer\SearchScopes"  
     PART "Ask Kids"   
     CHECKBOX VALUENAME LiveChoice     
     ACTIONLISTON     
     KEYNAME "Software\Policies\Microsoft\Internet Explorer\SearchScopes\{BF9CED03-41B4-44E9-8850-87E374BEDA17}"     
     VALUENAME DisplayName    VALUE "Ask Kids"     
     VALUENAME URL    VALUE "http://www.askkids.com/web?q={searchTerms}&search=search&qsrc=0&o=0&l=dir"   
     VALUENAME FaviconURL VALUE "http://www.askkids.com/favicon.ico"     
     END ACTIONLISTON  
     END PART  
       
     PART "Bing"   
     CHECKBOX VALUENAME BingChoice     
     ACTIONLISTON     
     KEYNAME "Software\Policies\Microsoft\Internet Explorer\SearchScopes\{A6CF48A4-CC6B-46CA-B51A-AA3B0DC46532}"     
     VALUENAME DisplayName VALUE "Bing"     
     VALUENAME URL VALUE "http://www.bing.com/search?q={searchTerms}&form=IE8SRC&src=IE-SearchBox"  
     VALUENAME ShowSearchSuggestions VALUE NUMERIC 1  
     VALUENAME SuggestionsURL VALUE "http://api.bing.com/qsml.aspx?query={searchTerms}&market={Language}&form=IE8SSC&maxwidth={ie:maxWidth}&rowheight={ie:rowHeight}§ionHeight={ie:sectionHeight}"  
     VALUENAME Codepage VALUE NUMERIC 65001  
     VALUENAME FaviconURL VALUE "http://www.bing.com/favicon.ico"     
     END ACTIONLISTON  
     END    PART  
       
     PART "Google"   
     CHECKBOX VALUENAME GoogleChoice     
     ACTIONLISTON     
     KEYNAME "Software\Policies\Microsoft\Internet Explorer\SearchScopes\{012E1000-F331-11DB-8314-0800200C9A66}"     
     VALUENAME DisplayName     VALUE "Google"     
     VALUENAME URL      VALUE "http://www.google.com/search?q={searchTerms}&sourceid=ie7&rls=com.microsoft:{language}:{referrer:source}&ie={inputEncoding?}&oe={outputEncoding?}"  
     VALUENAME ShowSearchSuggestions VALUE NUMERIC 1  
     VALUENAME SuggestionsURL  VALUE "http://clients5.google.com/complete/search?q={searchTerms}&client=ie8&mw={ie:maxWidth}&sh={ie:sectionHeight}&rh={ie:rowHeight}&inputencoding={inputEncoding}&outputencoding={outputEncoding}"  
     VALUENAME FaviconURL  VALUE "http://www.google.com/favicon.ico"     
     END ACTIONLISTON  
     END    PART  
       
     END POLICY  
     END CATEGORY  
     END CATEGORY  
       
 [strings]  
 SUPPORTED_IE7="At least Internet Explorer 7.0"  
 WindowsComponents="Windows Components"  
 InternetExplorer="Internet Explorer"  
 Search_Explain="Adds registry entries to HKCU\Software\Policies\Microsoft\Internet Explorer\SearchScopes for specific search providers. Check or clear the checkbox next to each search provider.\n\n If you enable this policy setting and if the "Restrict search providers to a specific list of providers" Group Policy setting is enabled, the checked entries will be the only ones that appear in the Internet Explorer drop-down list. If the "Add a specific list of search providers to the user's search provider list" Group Policy setting is enabled, the checked entries will be added to the user's list of search providers.\n\n If you disable this policy setting or do not configure it, search will be governed by the other relevant policies in this category. See the other policies mentioned here for additional information."  
If you wish to add your own search providers, its very easy, just follow the layout of the others in the file, the only speed hump you may hit is finding the ID of the search provider, if worse comes to worse, simply add it to your own local IE browser, then pull it out of your local registry.

Now that you have the ADM file, we can load it into your Group Policy editor, and enable it!

Start by adding the newly created template into your Group Policy Object.

Above: Right clicking on 'Administrative Templates' under User Configuration.


Click Add and select your ADM file.

Once you click close, Group Policy Management Console should refresh, as you have added a new item
Note: If you get an error about

Error 62 The corresponding string was not found in the [strings] section
Found: !!windowscomponents
The file can not be loaded

Ensure in the file the line that contains [strings] has NO other spaces around it, the line must only contain "[strings]" otherwise it will fail. I have noticed some of the scripts on the internet have an extra space, which seems to have been added during the upload process.

Above: GPMC with the new Classic Administrative Templates section.

Now you may note there is a section called "Classic Administrative Templates (ADM). This is where our new policy setting has been installed into.

Above: The options in the new policy object.

Now all that's left to do is enable the search providers that you would like them to access, and apply the GPO to an Organizational Unit of your choice!

Just remember this is a USER policy, so applying it to a Computer OU isn't going to do much :)

I'm yet to test this method with IE9, but as its though the correct channels there should be no reason why it wouldn't work.
Edit: I have tested with and it works fine in Internet Explorer 9.

Saturday, April 23, 2011

Yealink SIP-T38G SIP-T28P

We just received our long awaited Yealink SIP-T38G IP Phone!


I'll be reviewing the latest Yealink phone very shortly, so for now, you'll just have to enjoy the box shot and read the PDF while I put together the rest of the article!

Sunday, April 17, 2011

Deploying Adobe Reader X


Just a quick post to link an amazing resource I just found for deploying Adobe Reader X.

Using the Adobe Customization Wizard X, you can edit the Adobe Reader MSI with ease, then simply deploy the setup.exe via GPO or SCCM without hassle!

To read more follow the link below.

http://blog.stealthpuppy.com/deployment/deploying-adobe-reader-x/

Tuesday, September 14, 2010

Terminal Server - 2008 R2 - Force Domain Login

So you've built your shiny new Windows Server 2008 R2 Terminal Server, virtualised it and it's all going well, except for one thing.

Every time you RDP to it, you get presented with the local login, not the domain login!

(Above: Login screen to the Terminal Server, with a computer name of 'ORION')

So all the users have to type Domain\Username , or username@domain. Which is fine, if they are a little comptuer savvy, however forcing the Terminal Server to logon to the domain first time is much nicer!

So here are the steps to force the RDP session to open with your domain instead of the local machine as the authentication target!

First login to the TS (Terminal Server) with a user with administrative privileges.

Then open Remote Desktop Session Host Configuration:

(Above: Launching the application from the start menu)

Once you're in, navigate to the 'RDP-Tcp' connection, located under connections.

(Above: Remote Desktop Session Host Configuration main screen)

Now right click on RDP-TCP and select properties.

(Above: Right click menu on 'RDP-Tcp')

Once the Properties window comes up, navigate to the "Log on Settings" tab.

(Above: General Tab of RDP-Tcp properties window)

(Above: Log on Settings tab of RDP-Tcp properties window)

This is the page where you can specify your domain, which will force the TS to have "log on to: domain" when the user connects via RDP.

(Above: Filled out Log on Settings tab of RDP-Tcp properties window)

Remember to click 'Always prompt for password' and leave the Username field blank, as this will ensure the user still has to login, while providing the domain for them so they do not have to remember to type it in.

Once that is complete, simply click ok, close all your windows and attempt and RDP session and you should see your domain on the login screen!

(Above: Success! "Log on to: Domain" instead of log on locally!)

And that's it. It just.. works. Well, so I've found at least. :)

Wednesday, June 23, 2010

Windows Server 2008 R2 WSB - Adding Extra Drives

One thing that has changed from Server 2008 to Server 2008 R2 is how you add multiple backup drives to WSB (Windows Server Backup).

In Server 2008 you could simply add a drive, then unplug it and plug the next drive in, and add that drive. You could continue this until you had added all the drives.

However in Server 2008 R2, be it by design or fault, you can no longer do this. If you try you get all the way to the end, added the destination drive and get this wonderful error.

"The filename, directory name, or volume label syntax is incorrect"

Very descriptive no?

Essentially WSB is trying to contact ALL of the backup drives configured for backup. So because the others are off-line it fails.

So to add multiple drives without having to find 5 USB ports and run all drives simultaneously we need to head over to command prompt and utilize the WBADMIN utility.

We start by using WBADMIN to list all the drives currently attached, as we need to use the Disk Identifier to add the disk.

To get a list up we issue the command WBADMIN GET DISKS . This will list all currently attached drives, mounted or not.


So as you can see the drive we are interested in is the last one. So its as easy as copying the entire Disk Identifier string and putting that into the next command.

Next we use the WBADMIN to add the disk to the backup schedule.

Simply type WBADMIN ENABLE BACKUP -addtarget:

So the Disk ID will be different for you, so paste the ID you copied earlier.


Now we will get two prompts once we execute this command. The first will be asking if we are sure we want to add this drive to the schedule. The Second will be asking if we want to format the disk and add into WSB. We want to say Yes to both of these!


Once both prompts have been accepted it will format the drive, it uses a quick format so it doesn't take too long..


And then if all was successful we are taken back to the command prompt and it should look like this


If you take note of the Label it says, we can verify it was added to WSB by checking for that Label.


And there we have it, another drive successfully added to WSB!

Thursday, January 15, 2009

Windows 7 Boot Up Screen

Well its installed.

This is a screen cap of the boot up screen, as its vastly different to all other windows boot screens.

Taken from Virtual PC 2007.


Tuesday, January 13, 2009

Windows 7 Beta - Build 7000!


Well, I've just downloaded Windows 7 Beta 64-bit from MSDN, and I am going to give it a shot as my normal operating system.

Going to install Windows 7 Ultimate, fresh install not an upgrade. Will report on how it all goes after the wipe!

Thursday, December 11, 2008

Radius Server with WPA2 in 2008

RADIUS

In Windows Server 2003, to enable Radius authentication Internet Authentication Service needed to be installed and configured. Now in Windows Server 2008 this has been replaced by Network Policy server.

Network Policy Server

Network Policy Server (NPS) is the Microsoft implementation of a Remote Authentication Dial-in User Service (RADIUS) server and proxy in Windows Server 2008. NPS is the replacement for Internet Authentication Service (IAS) in Windows Server 2003.
As a RADIUS server, NPS performs centralized connection authentication, authorization, and accounting for many types of network access, including wireless and virtual private network (VPN) connections. As a RADIUS proxy, NPS forwards authentication and accounting messages to other RADIUS servers. NPS also acts as a health evaluation server for Network Access Protection (NAP).


Installation

Open Initial Configuration Tasks, and click Add Roles.

Select Network Policy and Access Services, and click Next.

Click Next after you have read through the Introduction.

The next screen you will be presented with is the ‘Select Role Services’. Network Policy Server needs to be selected to use any of the items. Routing and Remote Access Services is for enabling VPN termination, you may install this at the same time if you plan to run this server as a VPN server, for now it will not be installed.

Select the Host Credential Authorization Protocol, you will be prompted with a dialog box that looks a little like this:


Simply click ‘Add Required Role Services’ as all of these items are required for the sub section of this role.

Simply click next and next until you get to the Confirmation page, triple check you have all the roles selected that are required, and click install.


Once the NPS has been installed, and the server restarted Radius installation can begin.

Open the Network Policy Server from Start, Administrative Tools, Network Policy Server


Creating the Radius policy is now made easy with the Network Access Protection wizard. Simply select RADIUS server for 802.1X Wireless or Wired Connections, and click Configure NAP.


Once at this stage you will need to configure your access point as well. Each Access Point configuration varies, but you should have something like WPA2-Enterprise, once you select this you should be able to enter the IP Address of this server, and enter the secret we are about to setup. Consult your manuals or forums on locating your radius setup on your AP.

Radius works by creating a secure link between the radius server and radius client, so on the next page you must create a Radius client.


Type in a name for your client, this is purely only for the administrator as a readable name, the server uses the IP address when trying to communicate.

Pick a “secret” or password that you will enter on your Access Point, this will be how the client and server know each other and can verify the connection.

Now click next once you have created your Radius Client.

Now select Microsoft: Smart Card or other certificate, this will use any existing certificate that has been created on the server.


Now add the groups of users that you want to be allowed to access the radius authentication.

Now click next and finish, and you have created a Radius policy.

Depending on your Access Point, the configuration will be different.

But essentially you will have to configure Radius Authentication


So once you link your Access Point to the server, when you try to authenticate users they will be required to get a certificate. I'll outline out to request a certificate from the server in the next post.

Changes from 2003 to 2008

Server Manager

This is probably the largest change between 2003 and 2008, with the ability to centrally manage and control all features and roles that your 2008 Windows Server is running.


The Windows Server® 2008 operating system eases the task of managing and securing multiple server roles in an enterprise with the new Server Manager console. Server Manager in Windows Server 2008 provides a single source for managing a server's identity and system information, displaying server status, identifying problems with server role configuration, and managing all roles installed on the server.


Server Manager replaces several features included with Windows Server® 2003, including Manage Your Server, Configure Your Server, and Add or Remove Windows Components.

Server Manager also eliminates the requirement that administrators run the Security Configuration Wizard before deploying servers; server roles are configured with recommended security settings by default, and are ready to deploy as soon as they are installed and properly configured.


Roles and Features

The next main change from 2003 to 2008 is the idea of Roles and Features, like in 2003 when you went to add a windows service, Add/Remove programs was your only option. Now in Windows Server 2008 you can add services via their separate Roles and Features section in the server management.


Just like in Add/Remove Windows components, each item in Roles and Features can be ticked to install, and ‘details’ can be clicked to add more specific items to the installation.

Each section, Roles and Features, can be viewed individually via the Server Manager Console. This enables administrators to quickly and more efficiently view what has been installed and configured so they can determine if they are on the server they want to be on.

Above: Roles viewed from Server Manager

Above: Features viewed from Server Manager

Windows Firewall

Windows Server 2008 introduces a new and improved firewall; the Windows Firewall with Advanced Security. The new Windows firewall introduces many improvements and is very similar to the firewall that was included with Windows Vista. Features included with the new Windows Firewall with Advanced Security include:

  • Granular inbound access control
  • Granular outbound access control
  • Tight integration with the Windows Server 2008 Server Manager, with automatic configuration of the firewall when services are installed using the Server Manager
  • Highly improved IPsec policy configuration and management, and a name change. IPsec policies are now referred to as Connection Security Rules
  • Improved monitoring of firewall policy
  • Improved monitoring of IPsec policies (now called Connection Security Rules)
  • Improved centralized monitoring of Main and Quick Mode Security Associations

Monday, November 3, 2008

DHCP Scope Subinterfaces

How to get DHCP forwarding working with Cisco Router Subinterfaces
Configure subinterfaces on your Cisco Router, and ensure they each have an IP address in their subnet they will operate in.

eg,
FastEthernet 0/1.10
encapsulation dot1Q
ip address 192.168.0.1 255.255.255.0

Now we are using a Windows Server 2008 machine to handle the DHCP scopes and leases, here is what our DHCP looks like.


So we have created a scope, like any other scope, for the 192.168.0.0 range. Now the thing about the leases is, you will only get a lease from a range you are in, so while your pc might be in a 172. range, you will never get a lease from the 192 range, as the router passes its own subinterface ip to the dhcp server and lets it know which subnet its from.

To enable the router to pass the DHCP requests onto the Server you must put this commnd on each of your subinterfaces.

Its called 'ip helper-address " where the is the IP of your DHCP server

so enter the subinterface configuration on the router and enter that command with your DHCP server in place.

So for us, it is

Router(config-subif)# ip helper-address 172.16.99.2

This will enable the subinterface to pass DHCP (and a few other broadcast based protocols, for a full list see here: http://www.ciscopress.com/articles/article.asp?p=330807&seqNum=9 ) through the router to our DHCP server, so that your clients in their VLAN can get valid IP addresses!