iTalkBB supply a preconfigured (and locked down) Cisco SPA-3102 which has an analog line output which you simply plug into any internet connection, plug a phone in and your done!
The problem is if you want to plug that VoIP number into another phone system and utilize the connection outside of their SPA-3102. iTalkBB do not officially support alternative connection methods so the only way previously was to perform a Man-In-The-Middle (MitM) attack and snoop the Username and Password.
The issue now is iTalkBB have moved from http to https and thus securing the MitM attacks from happening, so we are no longer able to retrieve the username and password for our own use.
So while this solution is a little cumbersome it's a reliable method of handling a connection to the iTalkBB supplied box and utilizing the number from another VoIP capable phone system.
 |
| Breakdown of connectivity |
(If you are using this with direct 3CX or another VoIP Phone system, the '3CX SBC' would be removed from the diagram)
Configuration of the iTalkBB SPA-3102 is locked, so we will need to configure the SPA-232D to take the ring type, hang up tones and line voltage the SPA-3102 delivers.
I personally use the 'Internet' port of the SPA-232D when installing into any network, this ensures there is no chance the DHCP server on the 232D can affect your local network, the only draw back is you need to manually enable the Web Admin from WAN Port in the settings first, this is done by plugging into the 232D on the Ethernet port, you should get an IP in the 192.168.15.x range; then visit the SPA-232D's default webpage on http://192.168.15.1 , login as admin
Start by logging into your SPA-232D as admin (default password: admin) and navigating to the Administration Tab.
You are required to change the Admin password to something other than defaults to enable the Web Access, so click on 'User List' on the left and modifying the password.

Now navigate to 'Web Access Management' also in Administration and click on the 'Enable' radio button (It's worth also clicking 'Enable' to the Remote Upgrade radio button at the same time, as you are unable to modify this option when logged in from the WAN interface.

Now you can plug the Ethernet into the 'Internet' port and manage it.
(Note: If you want your device to have a static IP on the WAN port, navigate to 'Network Setup' and 'Internet Settings' now and set the IP).
Now that the Cisco SPA-232D is on the network and ready to be configured we can navigate to the 'Voice' tab and down to 'Line 1' and change it to 'Line Enable: No' so that only the PSTN port is active.

Then we can move to the 'PSTN' section and begin configuring the PSTN line for SIP and PSTN settings.
At this point you will want to configure your phone system for a PSTN Gateway so you have some authentication details to use; if you're using 3CX navigate to 'PSTN Gateways' and setup a generic gateway device. If you are using this via an SBC enter the Static IP you set on the SPA-232D (Even though its on a different network the SBC will take care of that). Take note of the Gateway Port as well, Linksys/Cisco SPA-3102 would use 5062 as a default, we can set that here and in the SPA-232D.
Now back to the SPA-232D
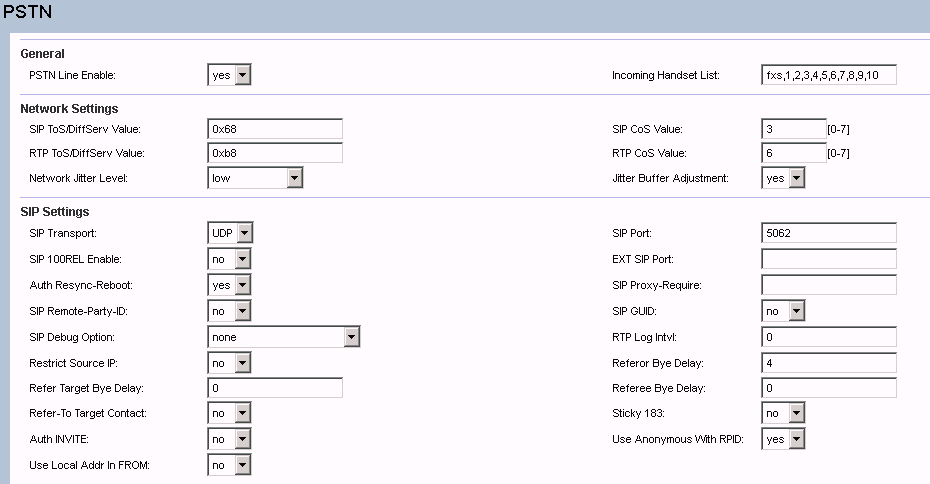
Make sure 'PSTN Line Enable' is set to Yes and the SIP Port is 5062 as we setup in 3CX (Set to something different if your Phonesystem wanted something different)
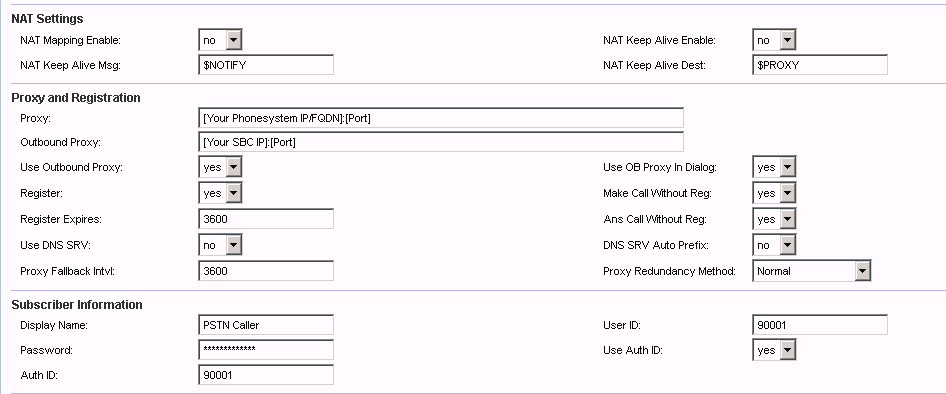
Now set your Proxy (Phone system IP/FQDN and Port)
(If using an SBC). Enable 'Use Outbound Proxy' and 'Use OB Proxy in Dialog'
In Subscriber Information leave the Display Name and enter your credentials you created earlier in the Auth ID, User ID and Password, and set 'Use Auth ID' to yes.


a. Set the 'VoIP-To-PSTN Gateway Enable' field to 'yes'.
b. Set the 'VoIP Caller Auth Method' field to 'none'.
c. Set the 'One Stage Dialling' field to 'yes'.
d. Set the 'Line 1 VoIP Caller DP' to '8'.

a. Set the 'PSTN-To-VoIP Gateway Enable' field to 'yes'.
b. Set the 'PSTN Caller Auth Method' field to 'none'.
c. Set the 'PSTN Caller Default DP' field to '8″.
d. Set the 'PSTN CID for VOIP CID' field to 'yes'.
e. Set the 'PSTN Caller ID Pattern' field to '*'. Note that in some geographical areas, this may cause incoming calls to fail, because the device incorrectly interprets the CallerID format. If this is the case, you may need to disable CallerID parsing by setting this field to empty.

Set your 'FXO Country Setting' to your Country that the iTalkBB was shipped to,
Lastly because this is plugged into an SPA-3102 the line voltage is much lower than your carrier's PSTN network, so we need to drop the 'Line-In-Use Voltage' down to be below the SPA-3102's ~28v, so change this to '18'
Now click 'Submit' and the SPA-232D should restart, register against 3CX and be available for receiving and making calls!
Now maybe one day iTalkBB will sell a direct SIP service and we can skip this whole mess!

