Controlling your users Internet Explorer 7, 8 and 9 Search Providers is very easy.
There are various methods of trying to change the search provider, but thanks to the new 'AntiPhishing' component of Internet Explorer 8, non-supported methods will end up with the user having a prompt when they first launch IE.
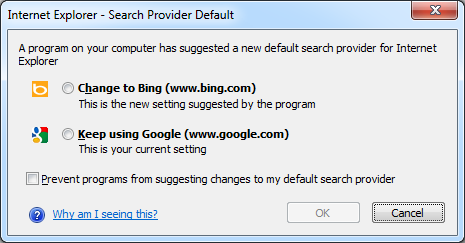 Above: Microsoft's AntiPhishing pop-up alerting the user that an unauthorized change had been made.
So the only way to control the search providers is via Group Policy. But of course Microsoft only included half of the required policies for this to be achieved out of the box.
Above: GPMC Path to the Internet Explorer Setting
When you "Enable" this feature, in the Help text it states.
Help:
 If you enable this policy setting, the user will not be able to configure the list of
search providers on their computer, and any default providers installed will not
appear (including providers installed from other applications). The only providers
that will appear will be those in the list of search provider policy keys
(found under [HKCU or HKLM\Software\policies\Microsoft\Internet Explorer\SearchScopes]).
Note: This list can be created using a custom administrative template file.
For information on creating this custom administrative template file, see the
Internet Explorer documentation on search providers.
So they have given us half the story and the rest you have to research and code yourself! Thanks MS!
Thankfully I found it to be a lot easier than I expected and found some resources with prewritten ADM files.
Simple copy and paste the next lot of code into Notepad, and save it as an ADM file. (Remember to select Save as type: All Files (*.*))
UPDATE: I believe i've fixed the output errors on the blog. So you can either copy and paste or download from pastebin.
http://pastebin.com/3SaKmqkG
Remember to 'Download' it, not copy, as even PasteBin formats it incorrectly. However it is ok when you click download from pastebin.
(Thanks Nebulis01 for the PasteBin :) )
IE8SearchProviders.ADM
 ; Based on 'Group Policy Search Providers ADM File', provided by schema_mangler
 ; Posted to microsoft.public.internetexplorer.general on 17 Nov 2006, 22:52
 ; Search Google Groups for the original, and see http://support.microsoft.com/kb/918238
 ; CRGS version changes:; Tidied up unnecessary [strings]
 ; Changed Bing, Google, Yahoo, Ask to latest versions, added Search Suggestions
 ; Added Amazon UK, eBay, Wikipedia via Microsoft site
 ; Also set the Google GUID to the lowest value, so that it is default

 CLASS USER
 CATEGORY !!WindowsComponents
 CATEGORY !!InternetExplorer

 POLICY "Select search providers to be included in policy-based search list"
     #if version >= 4
     SUPPORTED !!SUPPORTED_IE7
     #endif
     EXPLAIN !!Search_Explain
     KEYNAME "Software\Policies\Microsoft\Internet Explorer\SearchScopes"
     PART "Ask Kids"
     CHECKBOX VALUENAME LiveChoice
     ACTIONLISTON
     KEYNAME "Software\Policies\Microsoft\Internet Explorer\SearchScopes\{BF9CED03-41B4-44E9-8850-87E374BEDA17}"
     VALUENAME DisplayName    VALUE "Ask Kids"
     VALUENAME URL    VALUE "http://www.askkids.com/web?q={searchTerms}&search=search&qsrc=0&o=0&l=dir"
     VALUENAME FaviconURL VALUE "http://www.askkids.com/favicon.ico"
     END ACTIONLISTON
     END PART

     PART "Bing"
     CHECKBOX VALUENAME BingChoice
     ACTIONLISTON
     KEYNAME "Software\Policies\Microsoft\Internet Explorer\SearchScopes\{A6CF48A4-CC6B-46CA-B51A-AA3B0DC46532}"
     VALUENAME DisplayName VALUE "Bing"
     VALUENAME URL VALUE "http://www.bing.com/search?q={searchTerms}&form=IE8SRC&src=IE-SearchBox"
     VALUENAME ShowSearchSuggestions VALUE NUMERIC 1
     VALUENAME SuggestionsURL VALUE "http://api.bing.com/qsml.aspx?query={searchTerms}&market={Language}&form=IE8SSC&maxwidth={ie:maxWidth}&rowheight={ie:rowHeight}§ionHeight={ie:sectionHeight}"
     VALUENAME Codepage VALUE NUMERIC 65001
     VALUENAME FaviconURL VALUE "http://www.bing.com/favicon.ico"
     END ACTIONLISTON
     END    PART

     PART "Google"
     CHECKBOX VALUENAME GoogleChoice
     ACTIONLISTON
     KEYNAME "Software\Policies\Microsoft\Internet Explorer\SearchScopes\{012E1000-F331-11DB-8314-0800200C9A66}"
     VALUENAME DisplayName     VALUE "Google"
     VALUENAME URL      VALUE "http://www.google.com/search?q={searchTerms}&sourceid=ie7&rls=com.microsoft:{language}:{referrer:source}&ie={inputEncoding?}&oe={outputEncoding?}"
     VALUENAME ShowSearchSuggestions VALUE NUMERIC 1
     VALUENAME SuggestionsURL  VALUE "http://clients5.google.com/complete/search?q={searchTerms}&client=ie8&mw={ie:maxWidth}&sh={ie:sectionHeight}&rh={ie:rowHeight}&inputencoding={inputEncoding}&outputencoding={outputEncoding}"
     VALUENAME FaviconURL  VALUE "http://www.google.com/favicon.ico"
     END ACTIONLISTON
     END    PART

     END POLICY
     END CATEGORY
     END CATEGORY

 [strings]
 SUPPORTED_IE7="At least Internet Explorer 7.0"
 WindowsComponents="Windows Components"
 InternetExplorer="Internet Explorer"
 Search_Explain="Adds registry entries to HKCU\Software\Policies\Microsoft\Internet Explorer\SearchScopes for specific search providers. Check or clear the checkbox next to each search provider.\n\n If you enable this policy setting and if the "Restrict search providers to a specific list of providers" Group Policy setting is enabled, the checked entries will be the only ones that appear in the Internet Explorer drop-down list. If the "Add a specific list of search providers to the user's search provider list" Group Policy setting is enabled, the checked entries will be added to the user's list of search providers.\n\n If you disable this policy setting or do not configure it, search will be governed by the other relevant policies in this category. See the other policies mentioned here for additional information."
If you wish to add your own search providers, its very easy, just follow the layout of the others in the file, the only speed hump you may hit is finding the ID of the search provider, if worse comes to worse, simply add it to your own local IE browser, then pull it out of your local registry.
Now that you have the ADM file, we can load it into your Group Policy editor, and enable it!
Start by adding the newly created template into your Group Policy Object.
Above: Right clicking on 'Administrative Templates' under User Configuration.
Click Add and select your ADM file.
Once you click close, Group Policy Management Console should refresh, as you have added a new item
Note: If you get an error about
Error 62 The corresponding string was not found in the [strings] section
Found: !!windowscomponents
The file can not be loaded
Ensure in the file the line that contains [strings] has NO other spaces around it, the line must only contain "[strings]" otherwise it will fail. I have noticed some of the scripts on the internet have an extra space, which seems to have been added during the upload process.
Above: GPMC with the new Classic Administrative Templates section.
Now you may note there is a section called "Classic Administrative Templates (ADM). This is where our new policy setting has been installed into.
Above: The options in the new policy object.
Now all that's left to do is enable the search providers that you would like them to access, and apply the GPO to an Organizational Unit of your choice!
Just remember this is a USER policy, so applying it to a Computer OU isn't going to do much :)
I'm yet to test this method with IE9, but as its though the correct channels there should be no reason why it wouldn't work.
Edit: I have tested with and it works fine in Internet Explorer 9.